Pages

Thursday, July 31, 2014

Antique End Table revamp

I have lots of painting projects to complete before the house is done. Given that we r still waiting to break ground means that I have ALOT of time to use on planning how I want our decor to look like. It's driving me slitely crazy, all the time we have to wait to turn in our building permit. One word= moratorium. Don't know what that means? Google it. Basically it stinks when u have your application ready to go and the county won't even look at it until the moratorium has been lifted. Enough venting...Moving on...lol.
With all This extra time I get to paint paint paint! Especially with the summer weather, it's perfect for it!
These lovely antique endtables were a gift from my hubs. He knows that I love antiques and whenever he runs into them  he thinks of me:) I instantly knew that I wanted to paint them and already had the color mind. I have been wanting to try out Annie Sloans Chalk paint so I figured I would splurge and buy some. I made my own chalk paint which I Loved how it turned out. But for this project I wanted a particular color and I didn't want to mess around trying to create the same color only discovering that it didn't work the way I wanted it. So I suggest; make your own chalk paint if u r willing to play around to get the effect you want. If u mean business, and want a VERY spacific color, buy the ASCP:) I did and let me tell u...I LoVe it!
I used Annie Sloans Graphite, it's a soft grey/blue/charcoal. 

The great thing abou chalk paint is that I didn't have to sand or prime it before.
Removed the cute little doors and with a dry brush lightly went over the metal parts with gold acrylic paint. I painted only 2 coats of the graphite, I love the texture this paint has.

And here she is all finished!
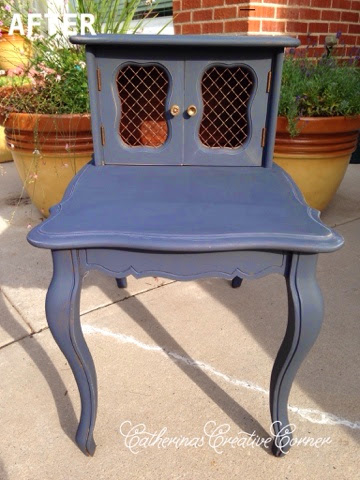
I love it!!!!!!! If I could hug it I would;)
I kept the inside the original color, so as to be able to see displayed things inside.
One missing piece for the door... but doesn't bother me...:) the other unfinished endtable has both knobs in tact to it will balance it out;) adds character;)

I distressed the corners and details to make them stand out more. I still have to put wax on it to finish it up, but I could not wait to share this so, here ya go! Now tomorrow I will be finishing up the wax and than start on endtable nr 2! 

Thanks for stopping by!
~Cat

ps.
at the party with http://linda-coastalcharm.blogspot.com/
&
http://knickoftimeinteriors.blogspot.com/

Tuesday, July 15, 2014

Choosing our Brick

 My husband and I have come to an agreement throwout this whole building process. I get to design the interior and he gets to design the exterior. With that said, our agreement applies as long as we dont hate the others choice. It is interesting enough, because I am quite surprised that my husband and I have actually almost the same taste in a lot of things! What a pleasant surprise!He has long dreamt of an all brick home. Where I have always loved the mix of finishes, rock and hardieboard to be particular. If it were up to me we would be building a traditional craftsman home, but it isn NOT up to me alone..lol..I am glad that he has convinced me to go with the all brick. Hopefully The whole look of the house will be very classic.  And I am finding that many of the new homes that are being built are very ``trendy`` in many ways. I bet we will get caught up in some of these as  well...but We want our home to have a certain timelessness. That is what we have in mind when choosing almost everything in our home. When picking things I always ask myself if this is something that one would find in an old house...(if we coul d find a functional old house to renovate we would...but our familes lifestyle is a bit different than oh say peeps in the 1800`s..so yup, were building).

We both are head over heels for old red brick homes, buildings etc. I LOOOOVE them. So with that in mind I am all for the all brick house!


There are so many advantages to building an all brick home...
here is what ehow.com said


  1. Low Maintenance

    • Brick is very low-maintenance. A brick house will never need to be repainted. It won't be in danger of rotting, and termites and other pests will not damage brick. This durability not only makes brick a convenient and worry-free choice, but also saves homeowners money over time.

    Energy Efficiency

    • Brick is also more energy efficient than other building materials. It will help keep your home cool in the summer and warm in the winter and also lower your energy bills. According to the Palmetto Brick Company, the energy bills of brick homes are eight percent less than those in vinyl homes.

    Appearance

    • Brick offers an elegant, timeless look that improves as it ages. In addition, brick comes in a variety of colors, textures and finishes that won't fade with time.

    Insurance Discounts

    • Since brick is durable, fire resistant and pest resistant, home insurance costs are often lower for brick houses than houses constructed of vinyl or other materials. Over time, this discount can help recover the initial cost of brick.

    Noise Barrier

    • Brick walls block out noises from outside more effectively than other building materials, which creates a peaceful and calm atmosphere inside your home.

    Higher Resale Value

    • The elegance and efficiency of brick make it a top selling point in real estate. Choosing brick will ultimately increase the value of your home, making it easier and more lucrative to resell.


Read more : http://www.ehow.com/list_6588617_advantages-brick-homes.html

So off to the brick supplier we went to find the perfect brick.
Goal: We want a red brick home with black trim and black/charcoal roof.


Interstate Brick is where we found our 2 favorites... or so we thought;-).

Dartmouth

We loved it at the supplier, but quickly realized seeing it in larger scale that it didnt have enough color variation that we want to add texture and depth.


Stratford

Nice variation...Way to brown.

The supplier gave us a list of addresses to look up the brick that has been used in nearby homes.

And after driving around for 2 hours, we decided that those particular bricks where not what we had in mind. My husband knew exactly what brick he wanted, but none of these were it.

Back to the drawing board. We went back to the supplier and had a look at one brick that we had completely missed...Old Baltimore.

And we FOUND IT!..the exact brick Mr B liked!

Old Baltimore has a ton of color variations, we absolutely love it. We will be using a tan to chocolate color motar like in this close up picture..We are so excited!

Our sample swatch..the picture doesn't do it justice!


Installed brick. It's crazy how different colors pop out of it due to the trim color choices. Our accents will be dark charcoal or black.


Now let's get that dang moratorium lifted so we can turn in our building permit already!

Cat


Monday, July 7, 2014

Building our own Home


I havn`t had many projects going on since the past 6 months have been a whirl wind in our family. We moved and are currently staying with family as we begin the process of building our dream home. I am beyond ecstatic for this! Seriously I have been dreaming of this for ummm...my whole life.. lol
            Our front yard
Our side view from our front yard
Our sidewalk ;-)


As we wait on all the paperwork aka (a moratorium to be lifted) so we can get our building permit processed, I will be sharing with you the decor choices AND projects for our home to be. Once we finally break ground I will share with you the whole building process. We are our own GC for this big event, so this will  surely be an adventure for us! Luckily my husband has worked around this type of business his whole life and both his brothers built their own homes, so there will be many familiar things (many new I am sure too), but we are confident that it will turn out good:-)

So Stay tuned for more updates!


~Cat


Tuesday, December 17, 2013

Painters cloth table runner

Super easy project....

Measure how big you want your table runner...

 sew around the edges to prevent fraying...

tape it off where you want your design to be...

paint....( i used acrulic craft paint)

let it dry...

done!


Advent Candle Calender

This year I made a simple advent calender to count down the 4 sundays before Christmas. The usual tradition in Denmark is to make a wreath and place the candles on top of it. Well, I didn't have the time this year to make a wreath, so i just used some bottles and candles, placed them in my old antique sewing machine drawer with some hazelnuts for filler. I covered the ``coca cola``  on the bottles just with some plain brown paper. I couldn't decide on what to wrap them in, so it just ended up like this. Kind of half done I think..but i now have an easy alternative to the Advent wreath for next year. Perhaps next year I will wrap with some jute or the like....

My children truly have LOVED this tradition, of lighting one candle every sunday up to Christmas. We light the candle /candles, than turn off all the lights in the house, sing christmas carols...and just enjoy the ``light`` these little candles bring.


Super easy....and I love it;-)

This is our song book we use. (Given to my husband and I on our first christmas` together, Thanks Farmor (Grandma)!


Next week by this time it will be CHRISTMAS EVE! Eeeeeee :-)

We are beyond excited in this house. :-)

Merry Christmas...

hugs
cat

Monday, December 2, 2013

Painted Painters cloth Christmas Pillow

I finally finished these Christmas pillows that I have been working on since...hmmm....October?! 
I basically had the stenciled fabric in the closet for some time now, and all it needed was some pillows and sewing. So here they are. Loving the silhouettes I found this one on the internet ( I just googled it and this little guy popped up), printed it, cut it out and stenciled this little Drummer boy in the fabric with some craf paint. I got the idea from Dear Lillie. (love her stuff). I almost broke down and just bought her whole line of these, but I knew I could save a buck making them myself. And so I did. 
 Since I covered my couch pillows with these I made sure to only stitch something easy on the machine to pull out once christmas is over.
 OH and than I had to share this little picture. I am longing for a fireplace in my own home someday (big huuuuuuge siiiiiighhh)...lol, anyhow I would LOVE to put a nice wood sign with something to this sort over my mantle... someday, BUT until than I will be making a home made chalk sign instead. Made out of Painters drop paper (is that what it is called)? And some pastels...A white chalky one:-)
I love it. Not perfect (you see...Im NOT perfect...its just like me:-) And THAT is why I love it.
NOw I am off to finish cleaning my house. I have 27 people coming over for hot chocolate tonight (we go and visit our local christmas lights village) and a tornado of a 15 months old to keep up after until than...MUST keep the HOUSE clean...Hopefully I succeed.
Merry Christmas.

linking up with:

http://linda-coastalcharm.blogspot.com/

Friday, November 29, 2013

Children's room to CHRISTMAS room


Happy holidays everyone!
Hope you all enjoyed your thanksgiving. 

I have been super excited to share with you all the makeover that I did on my 6 year old daughter and 3 year old sons room. This is something I have DrEAmt about doing for years now; To completly transform their regular everyday bedroom to a Christmas themed bedroom.
I have planned and planned for a while now on how to do it. Basically I surprised them with new Christmas quilts and pulled out practically all their regular stuff in their room and replaced it with ChRiStMas things. I had soooo much fun doing this...

BEFORE
AFTER

The first thing i did was to find the perfect quilts. I wanted them to be holiday themed but not anything too "ugly sweater" styled ( if you know what I mean). I looked for something that could grow with them. Also in my romantic mind I would hope that when they had grown up and would someday come home from to visit their mom and dad for the holidays that they would come home to their quilts...lol...I know, I am a total sap and love anything sentimental. I found the quilt for my daughter on eBay and instantly fell in love with it! 

 Nikon Digital camera pic....mUuuuch better;-)
12/17/2013
I covered up her old wall applique with this home made christmas tree. I used command strips to keep it up and added a simple bakers  twine garland. A painted gold star to top it off.

For my sweet little boy I could not find anything that would match his sisters, and that still would be boy enough for him. I think I spent hours online...and than I realized that I would have to make one myself. Here it is...
Nikon Digital camera pic....mUuuuch better;-)
12/17/2013

My first attempt at quilting on a quilters sewing machine...my goodnes I was having WAY too much fun on this...especially with the "freehand foot". Oh dear, anyways...I LovE this new "brother" sewing machine!!!!! It ROCkS! I will have to post some more detailed pix with my Nikon, but for now folks, you get to view it through the eyes of my iPhone;-) lol ...

Next up sillouettes...
Oh dear, I have been working on some other sillouette projects ( will be posting them soon...but here's a hint..Christmas pillows). I just need to take their pictures so stay tuned!
So I replaced the old pictured sillouettes. With these new reindeer themes ones. Hello! I swoon everytime I walk by them!! I am very pleased how they turned out.:) I found some images online and than printed them out. Found my scissors and cut them out, than painted them with gold paint. I absolutely love how the texture shows through the gold. After 3-4 coats they look like they are gold leafed...stunning:) an unexpected surprise for sure! I glued them onto some music note fabric....( I also made snowflakes to cover up some stencils on the wall.
Another image....perfect for my boy and girls shares rooms.


A picture of the sillouette process
Christmas decor...
And to finish it off their very own tree ( thanks Ikea)
If I could only explain how big my kids eyes lit up when they saw the finish product! I surprised My little 6 yr old girl when she came home from scho...she walked into her room...and just stood with her mouth wide open, and a big smile on her face, her eyes wide and with both hands clasped together in complete awe!!! ( I had Christmas music playing In her room for the full effect)...The look on her face....priceless...It was .....TOTALLY worth it!! 
And there you have it...
A real little piece of Christmas heaven:)
Ps my littles have been going to bed wearing the Santa hats I left in their room...every night since!

Love it.

Thanks for stopping by:)
Cat

linking up with:
http://linda-coastalcharm.blogspot.com/
Related Posts Plugin for WordPress, Blogger...