Pages

Wednesday, December 1, 2010

Vintage Antique Heirloom Stockings

Do you ever wonder what to do with your heirloom nicknacks? You know, your Grandmas old antique pillow cases, old coins and things? Well, since we added a new little person to our family 7 months ago, it was time to make a Christmas stocking for my little man. Only the ones I made for my husband, my daughter and I , were a little outdates. Or shall we say, I just got tired of them. So I came up with this idea. I was going to take an old pillowcase that used to be my husbands Grandmothers. When we got it, I always wondered what I would use it for, since it was so old and all, but I kept them and they have sure come in handy! I also have collected many little treasures, things that used to be my great grandmothers, old coins from when I grew up in Denmark, old Danish "Nipse Naale"= antique glass needles, etc. This is what I created with it. I used;

  • Antique pillow case (my husbands belated Grandmothers)
  • 1 "Nipse Naal"= Antique glass needles; super traditionally antique from Denmark that I used to collect as a little girl. You could buy them at this specialty antique toy giftshop found in my hometown of Odense down this little cobblestone street, located in a over 100 yr old building. 
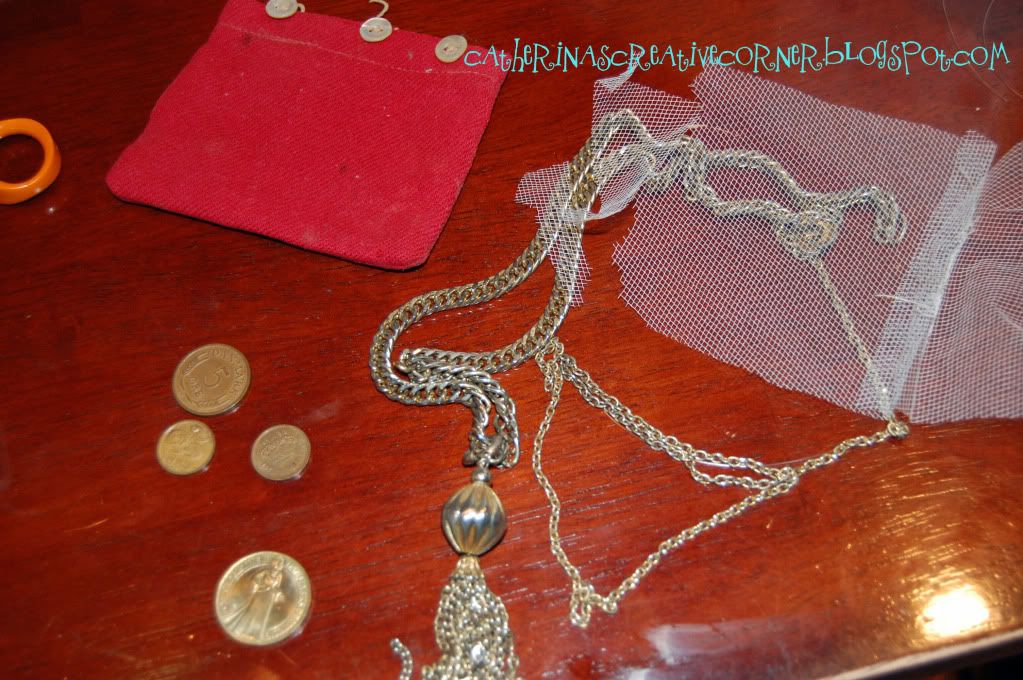
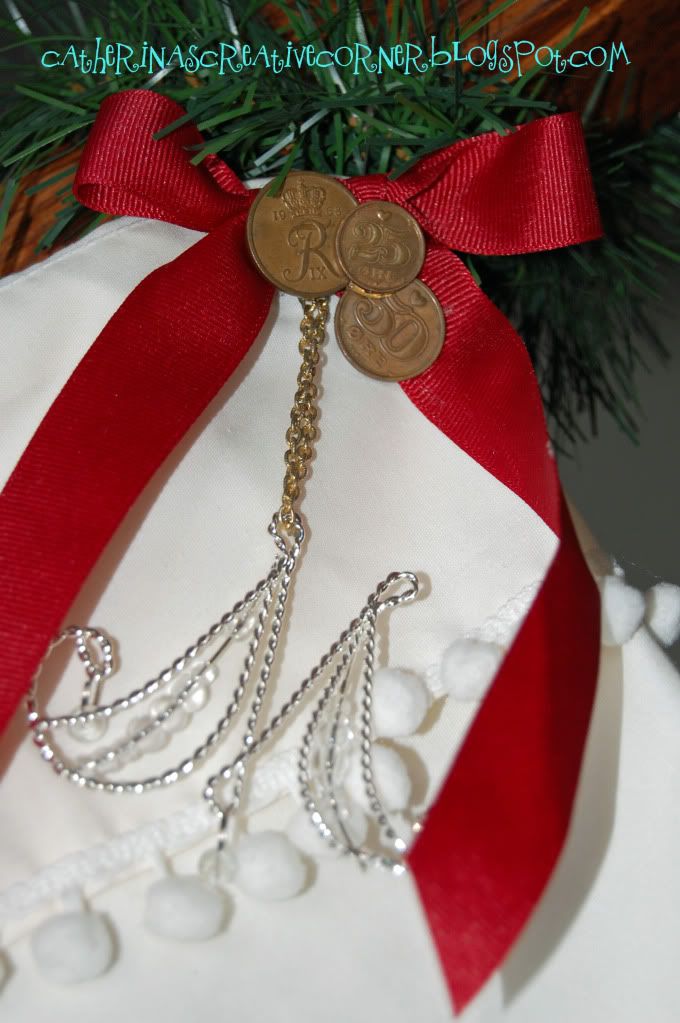
  • Antique silver necklace (used to be my great grandmother Alices's)
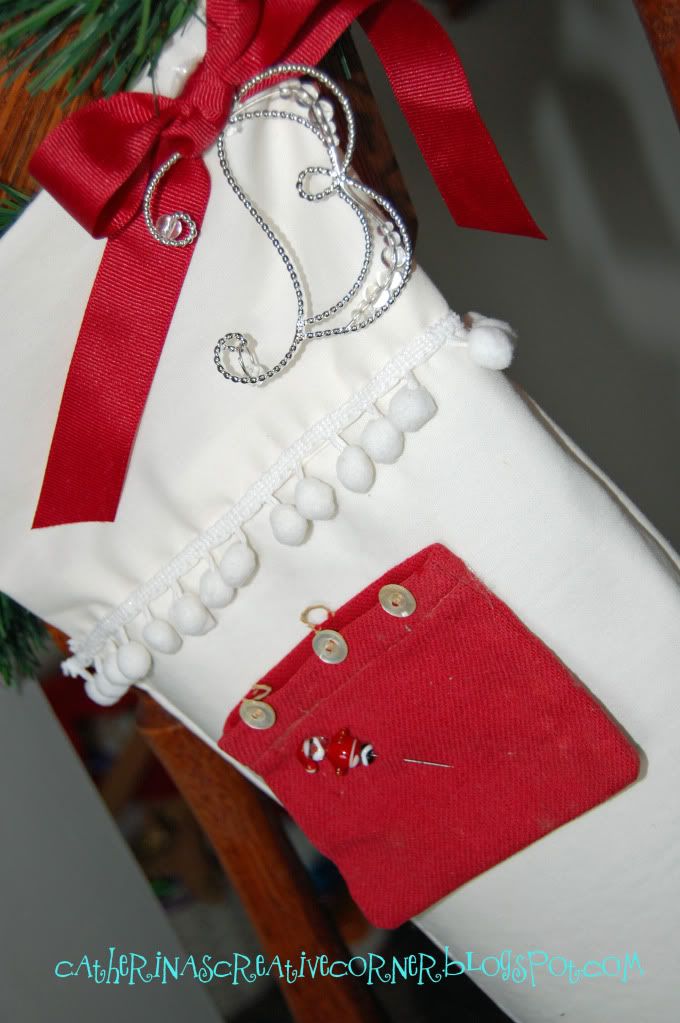
  • Antique button pouch found in my great grandmothers 1920's sewing machine (she was a seamstress in Denmark)
  • A few old Danish coins 
  • Ribbon, Toile, pompom ribbon edging, initial letters ($1 each at Target), and some additional "Jewel-Bling"
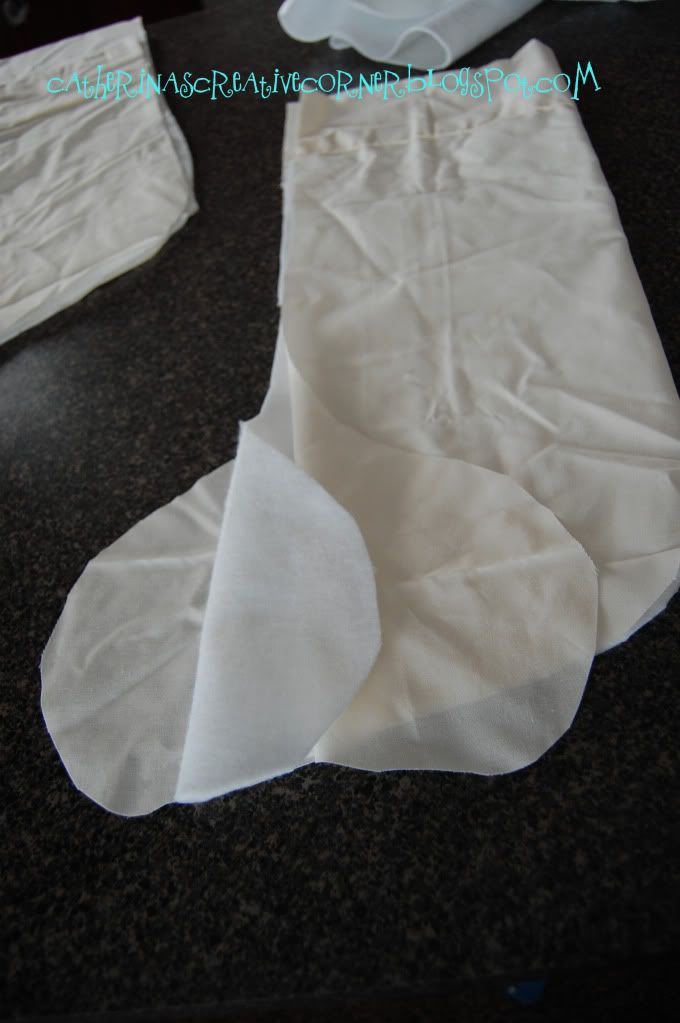
  • Self adhesive iron on felt, and a few extra scraps of cream colored fabric to substitute for more stockings when i ran out of my pillowcase.
If You want to make your own version of these, just look thru your old stuff and use whatever means something to you. It is always a waste it seems to me to keep all the lovely heirlooms we get in a closet or such, I make it my goal to find new, fun, modern ways to display these treasures that I may enjoy them as much as the last person did. Most of my Christmas decor is inspired from this idea. Well most of EVERYTHING I have is. I love it.

Here are my knick knacks;

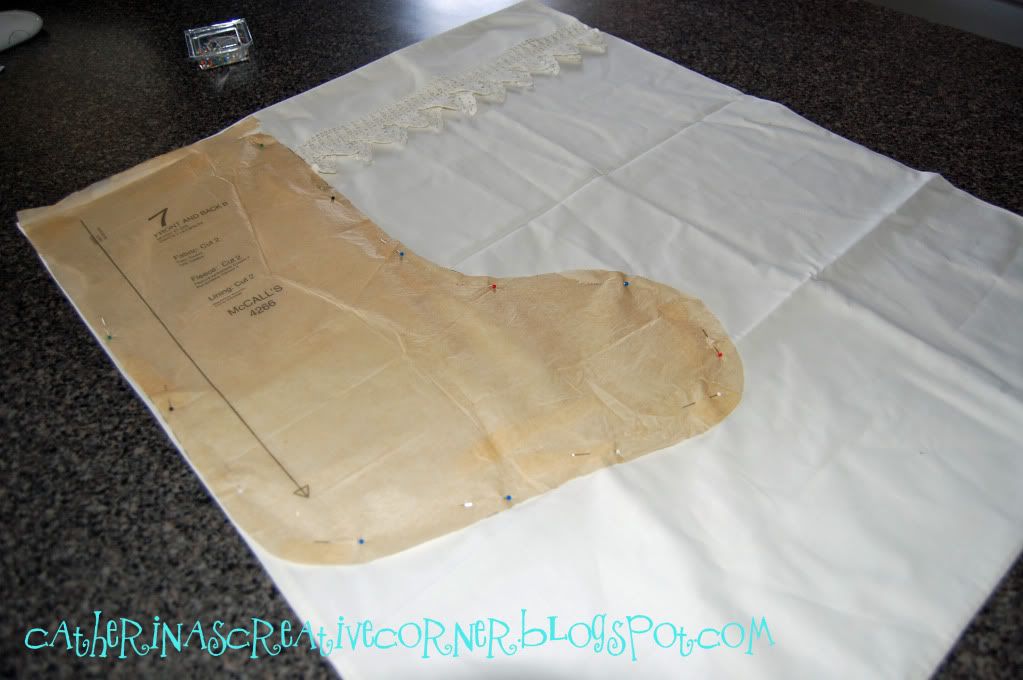
And old Mccalls stocking pattern
Iron on self adhedseve linning, to make the stocking "thicker".
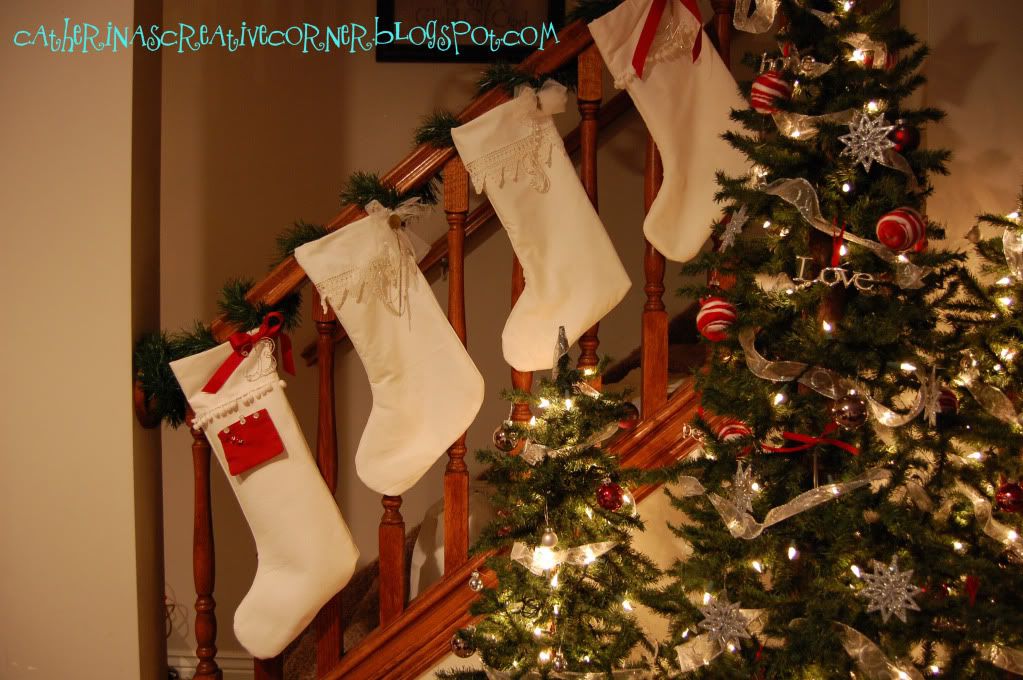
my hubbys stocking with my great grandmothers old button pouch and my "nipse naale"
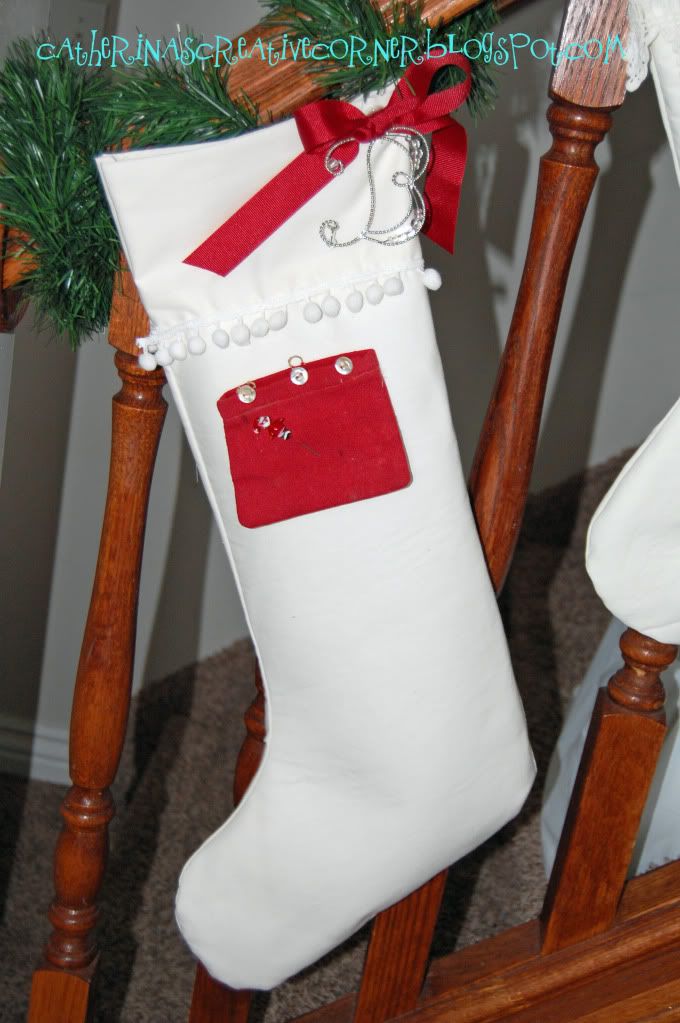
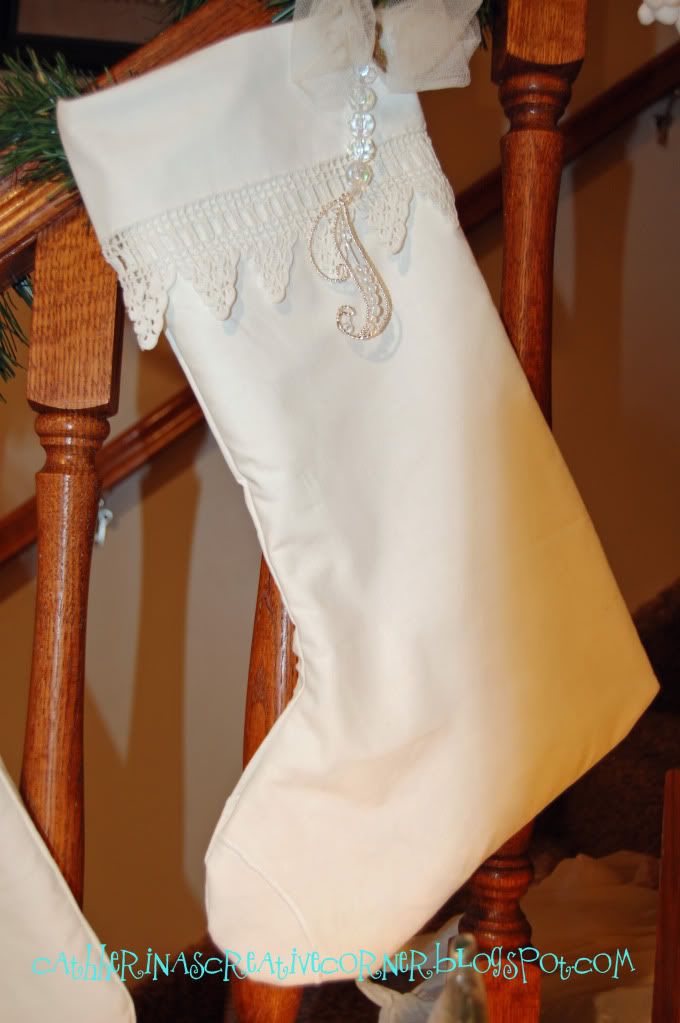
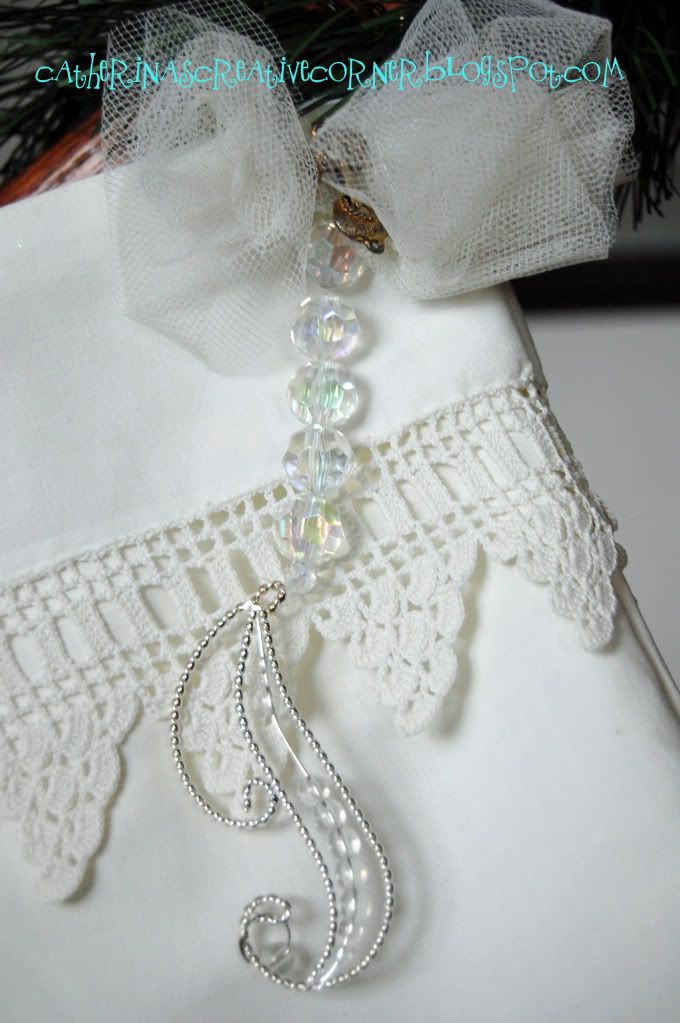
My Daughters stocking, blinged out, toile and a little piece of my great grandmothers necklace
My Stocking, with an added coin from Denmark, that is the Queen of Denmark on there...fitting for myself, hehehe:-) Also a piece of my great grandmothers necklace.
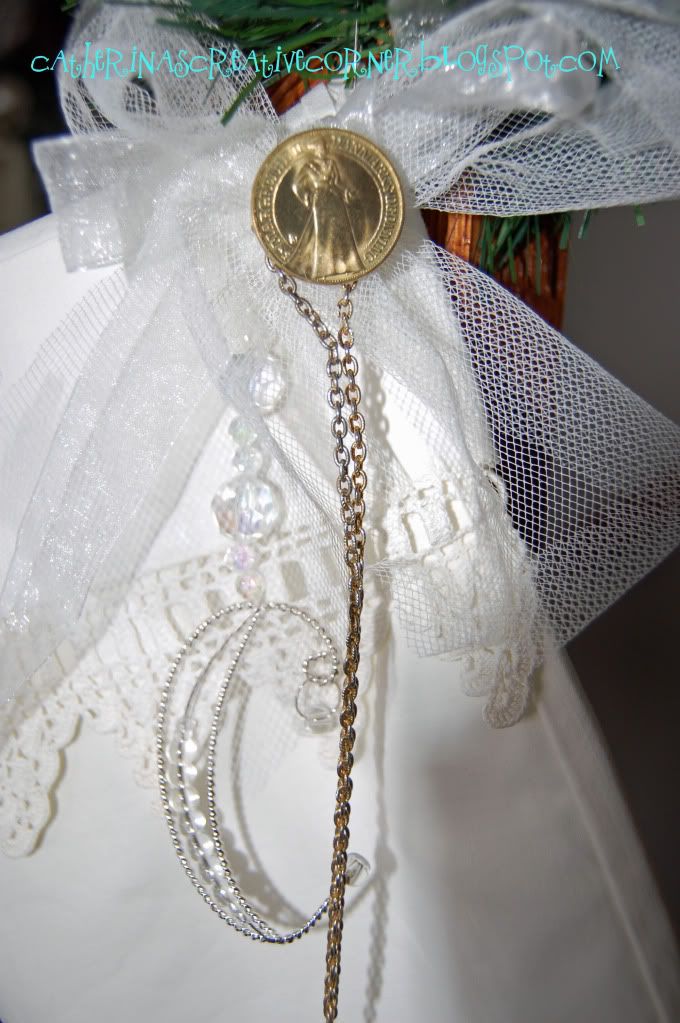
And this is my baby boys stocking, a few old coins, and again the old necklace.
All together. I CANT TELL you how MUCH these mean to me! Something special I can for sure pass down to my own kiddies. I AM IN LOVE! 

Sunday, November 28, 2010

Merry Advent!

Its the first day of ADVENT today:-) Hooray!
YES, I do know it is a little early, but I have started the tradition of putting up all of our Christmas Decor the day after Thanksgiving. This all stemmed from my American In-laws, and I was a totally strict on when we should put our tree and things up; the first week or two of December.BUT...THAN I saw how cute and excited they all got, and well, I joined them (because of jealousy, I was like "Hey I want to do that too, they are so Happy"! And now I am Happy too!! :-) Lol)
Here is what I have been busy with this weekend. We have a little apartment that we live in. Well it is more like a condo. We want to build our Dream Home someday, but until than this is home. Our living room is SUPER, I mean SUPER narrow. Not even room for a coffee table so a big old Christmas tree just doesn't fit. (Oh Coffee table how I long for you to be part of my life someday!) We use instead these 3 small skinny trees.  They work and are super cute, plus when we do move I can use them as my front porch lighted trees:-) 


Next is my makeshift Mantle. No I dont have a fireplace, BUT I I have used this cute bookcase that I redid this summer instead as my focal point. And OHHH HOW I LOVE IT!  I really cant wait to have a real mantle with this antique cream color. Divine! :-) 
Who needs a mantle ANYWAYS, hehehe! No really, I want one, but right now this will do:-) A girl can dream right? :-)
And now last but not least my homemade ADVENT WREATH. I am sure you have heard of the ADVENT CALENDARS, but the WREATH is also something we do in Denmark as a special tradition. Here is the definition of what it is all about;


The Advent wreath, or Advent crown, is a Christian tradition that symbolizes the passage of the four weeks of Advent in the liturgical calendar of the Western church. It is usually a horizontal evergreen wreath with four candles. Beginning with the First Sunday of Advent, the lighting of a candle can be accompanied by a Bible reading and prayers. An additional candle is lit during each subsequent week until, by the last Sunday before Christmas, all four candles are lit. Some Advent wreaths include a fifth, "Christ" candle which can be lit at Christmas. The custom is observed both in family settings and at public church services.

And here is mine!; We add singing Christmas carols too when we light ours. So "HYGGELIGHT" =danish word for Cozy.
Well there u have it! Oh and if u want me to post a "how to" on the Advent wreath I would be more than happy to do so, I just get so busy around here with my kiddies and my growing photography business, I forget when I am creating to write and photograph for a tutorial as I go. BUT I would love to share if anyone wants:-)

HAPPY HOLIDAYS EVERYONE!


SUPER SOFT GINGER SNAPS; my Favorite

I have two favorite cookies: Oatmeal Raisin and of course Chocolate chip. But I think that these are a good contender for either of those! Soft Gingersnap Cookies. I saw this recipe on TV the other day and simply had to try them. HOME RUN, there were THE BEST!

Ok, let me say it again....;"Oh my goodness, these are GOOD"! I absolutely love the molasses cookies you can buy in the store, but these homemade soft gingersnaps are even better! One must try these :-) My little 3 yr old could not stop sneaking her little hands into the cookies jar for the next few days, until they were all gone!

And best of all they are a "Snap" to make!
I think that perhaps next time I make these I will add a bit more ginger, to give it a little "kick" and than perhaps Bella will stay away from my cookies;-)


Ingredients:
  • 1/2 cup butter, softened
  • 1/4 c. corn oil
  • 1 egg
  • 1 cup sugar
  • 1/4 c. molasses
  • 2 cups + 2 T. flour
  • 2 t. baking soda
  • 1 t. ground ginger
  • 1 t. cinnamon
  • 1/2 t. salt
Method:

Combine butter and oil in mixer bowl and beat until smooth. Beat in the egg, sugar and molasses. Sift the flour, baking soda, ginger, cinnamon and salt together. Add to the egg mixture to form a dough.

Roll into 1" balls and coat with additional sugar. Place on ungreased cookie sheets. Bake at 350° for 8 to 10 minutes or until puffed. Cook on the cookie sheet for several minutes. Remove to wire rack to cool completely.

Makes 4 dozen.

Recipe from the Junior League of Salt Lake City's Always in Season Cookbook featured on Studio 5 KSL

Monday, November 22, 2010

Ready~ Set~ GO!

I am just anxiously awaiting for Friday, so I can start putting up my Christmas Decor! More to come soon:-)...No I will not be shopping....I value my life too much! :-) Will be doing a bit shopping ONLINE though, with a cup of Hot cocoa, and in my PJ's:-)

Thursday, November 11, 2010

Simple Fall Decor~ Very simple

~Simple small REAL pumpkins~

The other day I took my babies out for a "Nature" outing. I wanted to check out a new photo shoot location, a nearby park. We started gathering all the bright colored leaves and a few pinecones and took them home. Pulled out an old Harvest Figurine that I had,  added a few nuts to the ensemble and now, presto, we have our fall decor! All natural...all FREE! lol! And kind of Pottery Barnish'. So there you have it, a fall decor idea! So easy, so fun!

Wednesday, October 27, 2010

Butternut Squash & Pear Soup, sooo good!


My sister and her boyfriend came over for dinner this evening, and I wanted to make something special and in season.. So after some research and combining a few different recipes I came up with this one. It is was a HiT! 
This is a YUMMY soup for a nice cold Fall Day! It is savory & sweet with a little spicy {kick} to it, (not too spicy mind you, because I dont like spicy but this one is delish! 

BUTTERNUT Squash & PEAR Soup


2 tablespoons salted butter
2 tablespoons olive oil
4 small leeks (rinsed & chopped)
2 tablespoons mild Curry Powder
6 pounds Butternut squash (about 2 large)
3 ripe Pears
2 teaspoons Salt
1/2 teaspoon freshly ground black pepper
4 cups chicken stock
Gorgonzola crumbles for garnish


Directions:
Warm the butter, olive oil, leeks, and curry powder in a large stockpot uncovered over low heat for 15 to 20 minutes, until the leeks are tender. Stir occasionally, scraping the bottom of the pot.
Peel the squash, cut in half, and remove the seeds. Cut the squash into chunks. Peel, quarter, and core the pears. Cut into chunks.
Add the squash, pears, salt, pepper, and the chicken stock. Bring to a boil, cover, and cook over low heat for 30 to 40 minutes, until the squash and pears are very soft. Puree it coarsely in the bowl of a food processor fitted with a steel blade. (You will have to do this in batches since it is a lot.)
Pour the soup back into the pot. It should be slightly sweet and quite thick. Check the salt and pepper and serve hot.
Once served in bowls, add a bit of Gorgonzola crumbles for garnish. 

Saturday, October 9, 2010

Danish Rhubarb Custard Recipe from Petersgaard Manor


This recipe I had to tweak a little to get the right temperatures for cooking. The original recipe called to bake it for 30 min at 395F, but I found that baking it as I state below works better. I made this for the first time the other night and my whole family loved it. Even my sweet all American hubby thought it was yummy:-) I will be making this more! 

On the very south of Denmark, on the Island of Sjaelland, amidst yellow fields, green forests and pastures lies Petersgaard Manor.  Built in the early 1700, as part of Frederick IV's national riding districts. Now the manor is run by the Iuel family. Here is a delicious dessert recipe that they make at the Manor. It is actually called a Rhubarb Cake, but is more like a custard in consistency with a "creme broulee" type of crust. YUM!!


Rhubarb Custard 

2 1/2 lbs fresh Rhubarb
1 cup granulated sugar
1/2 vanilla bean pod
1 quart whipping cream
6 eggs + 2 egg yolks
2 tsp vanilla sugar or seeds from 1/2 vanilla bean pod
1 Tbs Cornstarch
1/2 cup granulated sugar
The strained rhubarb juice

  1. Rinse Rhubarb stalks and cut into 1/2 inch cubes.  Place in greased baking dish with the 1 cup sugar and open sliced down the middle 1/2 Vanilla bean. Cover with aluminum foil and let bake in 395F preheated oven for 1hr or until the Rhubarb becomes cooked all the way thru.
  2. Remove the compote to a strainer over a pan and let all rhubarb juices drip for about 1 hr. Set aside.
  3. In large bowl, whip the cream until it become fluffy. Than place whipped cream, 8 egg yolks, vanilla, cornstarch and sugar in a large thick based pot over low heat. With a whisk blend it all together, and do NOT LET IT COOK. It needs to become thick and airy. Remove from heat and let it cool. 
  4. Once it is cool, add the 6 beaten (till stiff) egg whites to the cream mixture. 
  5. In a 9x11 greased dish, place the rhubarb compote to cover the whole bottom. Than the whip cream mixture on top, making sure not to fill all the way to the top (as it can tend to poor over during cooking).
  6. Place it on a covered baking sheet on middle rack in a preheated 395F oven for  about 15 min. This will give it a "creme brulee" type of crust. (Make sure not to burn). Than once it gets the darkness of crust that you prefer turn oven down to 350F for 30-45 min, until custard is stiff around edges and still a little jiggly in the middle. 
  7. Remove from oven and let sit until cool. (It will stiffen the colder it gets).
  8. To serve drizzle a tiny bit of the strained rhubarb juice on top. (Optional)
"Velbekommen!"


Wednesday, October 6, 2010

Vintage Inspired Halloween Tumbleweed Decoration


I spent my Tuesday on creating this new fun vintage inspired Halloween Decoration. I simply LOVE the Vintage Halloween decorations that are all the rave these days. Especially the black and white ones. Well, I wanted to create something fun, cheap and pretty to look at so I picked my brain and came up with this. It reminds me of what we have in Denmark for Fastelavn, something called a "Fastelavnsris". Grabbed my 3 yr old girl, and baby boy in stroller and off we went on a "Halloween Walk". We looked around and with scissors in hand first clipped a few branches off a bush. But unfortunately none of the leaves had fallen off and they were all still green. When in the corner of my eye what was there...a big tumble weed that the recent storm ad "blown in". PERFECT! The best part of this is, that is only cost me.....drum roll please......ZERO $! Yep, I made this out of things I had laying around the house. So here is the recipe so you can make  your own. Feel free to make as many as you want! I only ask (since this is my original idea) that if you want to make your own and post it on the web that you link it back to my blog. AND SEND ME YOUR PICTURES! I want to see what you all can come up with ;-) 
Thanks and have fun creating!

You will need:

A tumble weed or your local naked twigs.

Black spray paint

Vintage Halloween Images printed to desired sizes. I used these, but you can google "Vintage Halloween Postcards" for more ideas;


Modge Podge

Black tissue paper

White tule

Glue gun & paint brush

Scissors

Some sort of card stock (I used the bottom of a orange Gymboree box)

Vase

Fabric to tie around your vase ( I used the edging of an old black skirt that I used to wear when I was 20!) Cut it and zigzag it kind of messy like...pulling and tugging too...creates a cool worn out effect).

Paper clips (as many as you have images to hang)

Needle nose pliers


  1. First find your tumble weed or twigs, trim down to desired size, spray paint it black. Let dry.
  2. While it is drying, go online and choose some of your favorite vintage Halloween pictures. (These are from flicker and you need to click on your image, then "view all sizes" and than right mouse click to Download them. Print them out according to the size you want. Your computer should have an option during printing set up preferences of how large you want them. E.g. I printed most out at 25-35%. Than cut them out.
  3. Next, use your cut images as a measuring tool to see how big you want your yellow card stock. (You use this for the back of your Vintage Cards). I cut mine about .25" outside of the line, so as to create a type of 'frame'.
  4. Next do the same thing with your black tissue paper. You want to layer: Orange Card stock-Tissue paper- Image on top. 
  5. Than with your paintbrush and Modge Podge, glue it all together. 
  6. While that is drying start cutting out small "ribbon like" pieces of Tule, and tying them in small knots, so they look like bows. (Its alright not to cut fine., perfect edges with your fabric to make it look all more Vintage and Old.)
  7. When all your images are dry, cut the edges out so it is kind of cutesie'ish..is that a word? lol
  8.  Than use your glue gun to attach the tule bows to the card.
  9. With Pliers unwind your paper clips and than wind the paperclip around the plyer head. (So as to create a "swirly" kind of spring". Stick bottom of paperclip thru tule bow and clamp the bottom together.
  10. Place crumpled up tissue paper into vase and stick your dried Black Tumbleweed inside. Start attaching your cute Vintage Images!
  11. Tie your fabrics around the Vase. (Tule & Black skirt).
  12. Last but not least "web" your  hot glue around your twigs to create creepy spider webs.


Tuesday, October 5, 2010

Fastelavn; The Danes version of Halloween

Thought I should post a bit about this tradition that I grew up with in Denmark. It happens around February. The children dress up and play games. They also eat lots of candy, but we dont go "Trick or Treating" for candy persay. They do it, door to door asking for money. (Oh the good times!)....Now that I am all grown up and live in the US, glad no kids knock on my door asking for cash! lol Anyhow, read about it, it is quite interesting. 


Fastelavn is the name for Carnival in Denmark which is the either Sunday or Monday before Ash Wednesday. Fastelavn evolved from the Roman Catholic tradition of celebrating in the days before Lent, but after Denmark became a Protestantnation, the holiday became less specifically religious. This holiday occurs seven weeks before Easter Sunday and is sometimes described as a Nordic Halloween, with children dressing up in costumes and gathering treats for the Fastelavn feast. The holiday is generally considered to be a time for children's fun and family games.


Some towns in Denmark are renowned for their large Fastelavn festivities and parades. Traditional events include slå katten af tønden ("hit the cat out of the barrel"), which is somewhat similar to using a piñata. The Danes use a wooden barrel, which is full of candy and oranges and has the image of a cat on it. Historically there was a real black cat in the barrel, and beating the barrel was superstitiously considered a safeguard against evil. After the candy pours out, the game continues until the entire barrel is broken. The one who knocks down the bottom of the barrel (making all the candy spill out) becomes kattedronning ("queen of cats"); the one who knocks down the last piece of the barrel becomes kattekonge ("king of cats").
There seem to be some small local traditions which are closer to the carnival traditions of other countries, including Ash WednesdayCarnival parades, Pancake Tuesday and eating special food after Ash Wednesday, but they are not particular to Danish culture.In Denmark and Norway a popular baked good associated with the day is Fastelavnsbolle (lit. "Fastelavns bun", also known in English as "shrovetide bun" or "lenten bun"), a round sweet roll usually covered with icing and sometimes filled with whipped cream. Similar buns are eaten in other northern European countries, for example the Swedish SemlaÍsafjörður is the only town in Iceland that celebratesFastelavn on the same day as the Nordic countries, the day being known as Maskadagur (from the Danish word maske, meaning to dress-up or put on a mask).
Another popular custom (especially among the children) is the "fastelavnsris", with which children ritually flog their parents to wake them up on the morning of Fastelavns Sunday (Quinquagesima).
Fastelavnsris have many shapes and forms and differ from area to area. In some areas they are bunches of twigs, usually from fruit trees and preferably with buds. Those are often decorated with feathers, egg-shells, storks and little figures of babies. In other areas, they are a bent willow-branch, shaped like an ankh and wound with crepe paper that has frizzles cut with scissors. Both varieties may be decorated with candy as well.
The custom is known already in the 18th century in Denmark and it has several roots. There is probably no doubt the custom originates from an old fertility ritual, which has been absorbed into Christianity. The more serious one is that after the reformation, particularly pious people used to flog their children on Good Friday to remind them of the sufferings of Christ on the cross. A similar custom is mentioned in the book "Frauenzimmerlexicon", published in 1715 in Leipzig (Germany), which describes how bachelors and virgins "bid each other goodmorning" by flogging each other and spreading ashes on each other. This custom is also known in Denmark.
Earlier, it was mainly the young women and the infertile who were flogged. It was also common that a young man would carry his "fastelavnsris" and (of course gently) strike at young women he met on the street. Later it became the children's special right to flog their parents on this day. In any case, the reward given for the flogging would be a fastelavnsbolle.

Monday, October 4, 2010

My First Real attempt at Halloween Decor


Here is a little view of my New Halloween Decor. And I get to highlight some of my classic books like Frankenstein, Sleepy Hollow and Dr Jekyll and Mr Hyde). I have really enjoyed decorating this year. Also trying to find ways to make new homemade things with my little 3yr old daughter. She loves "Activities" as she calls them. And notice the cool Bat Jar at the end of this page? Here is the link to the tutorial. It was so Cheap & fun!

Chocolate & Chocolate......LOVE!


It is Sunday evening, and when we are home and not out and about visiting family, I like to prepare a special meal. And....an ever so yummy dessert. I looked around at what I had in the pantry, checked out all my fav food websites, and started to throw something together. These yummy Cookie recipe is based off of Foodnetwork Ina Gartens recipe, but I tweaked it a bit to fit my fancy. I can never go wrong when making her food! Anyhow, these were Delicious! 
Try them they are oh so easy!


Double Chocolate Almond Cookies


Ingredients

  • 2 1/3 cups all-purpose flour
  • 3/4 cup unsweetened cocoa powder
  • 1 teaspoon baking soda
  • 3/4 teaspoon salt
  • 1 1/4 cups (2 1/2 sticks) salted butter, softened to room temperature
  • 1 cup sugar
  • 1 cup firmly packed dark or light brown sugar
  • 1 large egg
  • 1 teaspoon vanilla
  • 1 cups dark chocolate chips
  • 1 cup almonds, chopped

Directions

Preheat the oven to 350 degrees F.
In a medium bowl, combine the flour, cocoa powder, baking soda, and salt.
In the bowl of an electric mixer fitted with the paddle attachment cream the butter and sugars. Add the egg and vanilla and mix together. Add the flour mixture and continue mixing until just combined.
Add the chocolate and almonds and mix until combined. Using two tablespoons or a small ice cream scoop, drop the dough two inches apart on sheet pans lined with parchment. Bake for 15 minutes.
Cool the cookies on the cookie sheets. The cookies should be very soft when they are removed from the oven ( You will be tempted to start eating them while warm, but do not do it! They will be too soft and fall apart..... be patient, they will firm up as they cool.)

To be enjoyed with a tall glass of ice cold milk!

Thursday, September 23, 2010

Martha Stewart Revamp...


Halloween is coming, and I am so excited this year. I have been kind of a bah humbug for a few years about decorating for it (too much "cheesy or too disturbing Halloween decorations out there). Because I have a 3 yr old I wanted to get into the "spirit", and finally have found some decorations that "work" for me.  Ran off to Tai Pan Trading, and started buying small cute things but I needed a little more stuff and wasn't willing to pay an arm and a leg for it.  Martha Stewart had a tutorial on how to make these super cute paper lanterns, but of course the supplies needed were things that would again, cost me arm and a leg for only Paper Decorations. So I had to find an alternative...

CEREAL BOXES, BLACK SPRAY PAINT, TISSUE GIFT WRAP, SCOTCH TAPE & A BLACK SHARPIE.

I used 1 Kix Cereal box, cut it to work with her template, than spray painted the whole thing with glossy black paint.  While it dried I printed out on regular paper Marthas templates, than traced them onto the tissue. I cut it to shape so it would fit inside of the boxes. I made a little hole in the back of the box ( so I can insert some christmas lights later on, or perhaps even buy those battery operated votive candles.) So EASY~ SO CHEAP~ SO CUTE!
So, yeah instead of spending up to $20 bucks on Marthas idea (which by the way is soooo very cute, but not quite the time or $ that I want to make home made paper crafts that most likely will only last me this Halloween), I spent.....a grand total of.....$ 0.00! Yep I had all this stuff laying around the house....:-)

Needless to say I am a happy camper, and so is my little girl who is LOVING all of her "new halloween stuff" as she calls it.

ps. the smaller lantern with the moon is made out of a fruit snack box:-)

Saturday, September 18, 2010

Bookcase transformation

We have been collecting The 100 greatest books ever written from Easton Press for about 5 yrs now. Love the classics. And they are stacking up! I was on the search for an inexpensive bookcase and came across this one on KSL Classifies. $45 dollars later, a few coats of spray paint primer, Krylon's Ivory and Ralph Lauren's Glaze and Viola.....A NEW BOOKCASE! I love it, it really lightens up our room and helps out with our storage clutter. I cant wait to reclaim it someday too! The plan is when we build our future home we will have an office with built in bookcases and than I can have this piece for my doodads in my dining room:-) All good things! :-) I am so pleased how it turned out. (Now I will need a few days to rest my "painting muscles"; leg muscles are aching, and my right index finger that feels like its gonna fall off! lol )
Oh well....beauty hurts!


BEFORE

AFTER


Thursday, September 16, 2010

Hazelnut cake Recipe from Holsteinborg Castle Denmark


I have an old danish recipe book that my mother gave me many years ago. It features classic Danish recipes that have been passed down from generation to generation. But guess from where? DANISH CASTLES AND MANORS! Cool huh! So, I will be making these and blogging the english translation to them. Reason being that 1~they are in Danish AND 2~they run on the metric system e.g. measurements are in grams and liters. So, my first featured recipe comes from the Castle of Holsteinborg located on the island of Sjaelland.
Here is a little background about the Castle. 
The famous Childrens fairy tale author H.C. Andersen (Little Mermaid, Ugly Duckling, Thumbelina and many more ) even lived there for a time....

HOLSTEINBORG CASTLE
Holsteinborg Castle was built by the Trolle family between 1598 and 1651 but has been owned by the Holstein family for 12 generations, since 1707. The impressive main building consists of four two storey interconnected wings surrounded by a moat. The castle is surrounded by an extensive, undulationg park, which falls gently away to the south towards Holsteinborg Cove. Because of its outstanding beautiful setting, the castle is one of the best known in Denmark. From the main building you can enjoy the view of the Småland Sea and the great Belt, including the idyllic small islands, Glænø and Ormø.

HOLSTEINBORG CASTLE AND H. C. ANDERSEN
Hans Christian Andersen visited Holsteinborg Castle for the first time in may 1856 following innumerable invitations from Count Ludvig Holstein and Countess Joachimine (Mimi) Holstein. Until his death (1875), he returned to the castle almost every year, 35 times in all. Here he truly felt at home. On a photograph taken on the veranda in 1870 he wrote:" At Holsteinborg my sun-picture was created. For here fairytales in my heart was laid."


HAZELNUT CAKE

1 cup Hazelnuts
1 cup dark chocolate ( I used morsels)
4 large egg whites
8 TBS granulated Sugar

Whip cream for garnish

Coarsely chop nuts and chocolate. Beat egg whites and sugar together in large mixing bowl. Add nuts and chocolate with spatula (set aside a little for garnish). Bake cake in a greased spring form pan for 1 hr at 255 F. When it has cooled, remove from pan and place on a round serving plate. Garnish with fresh whipped cream and sprinkled with the leftover nuts and chocolate.


I was Featured on Envy My Cooking


So excited that just shortly after I started this blog I am featured on Envymycooking.blogspot.com! It is a super cute blog that has lots of yummy recipes and cute stuff people like to show as their "Envy my Find".

Well check it out, they featured my cute blue chair AND my Aebleskiver recipe!

Thanks Envymycooking!:-)

www.envymycooking.blogspot.com

Friday, August 27, 2010

Going wild for Krylons Blue Ocean Breeze & glazing


Old mirror that used to be silver (which I loved, but I was not in love with the gold accents) so why don't we just paint it blue, and glaze it?
Oh and the pictures on the wall is part of my continual adding collage. Love it! (Someday I want to display like a ton of these by my staircase in my dreamhome!:-)
Blue Chair, again ;-)

Painted some old frames, oh and by the way the bookcase they are on, I will be painting cream with glazing on it...another post:-)


Have always loved this color, I have an old antique danish book "Dansk Grafik" that I can finally display:-)


Well, thanks AllthingsThrifty for the GREAT inspiration! :-) I am falling in love with my apartment, which I by the way, thought would NEVER happen! :-)
Related Posts Plugin for WordPress, Blogger...