Pages

Friday, August 27, 2010

Going wild for Krylons Blue Ocean Breeze & glazing


Old mirror that used to be silver (which I loved, but I was not in love with the gold accents) so why don't we just paint it blue, and glaze it?
Oh and the pictures on the wall is part of my continual adding collage. Love it! (Someday I want to display like a ton of these by my staircase in my dreamhome!:-)
Blue Chair, again ;-)

Painted some old frames, oh and by the way the bookcase they are on, I will be painting cream with glazing on it...another post:-)


Have always loved this color, I have an old antique danish book "Dansk Grafik" that I can finally display:-)


Well, thanks AllthingsThrifty for the GREAT inspiration! :-) I am falling in love with my apartment, which I by the way, thought would NEVER happen! :-)

Chair Finished!


Here it is! I finished the seat. I ran out of staples, so it is "fluffier" than I wanted it to be, so still needs a few small adjustments, but I finished it:-) At least so we can use it in our photoshot coming on saturday, that my sweet sister in law Cherie will be doing for us. We have a sweet deal, I do her family pix and she does mine. :-) She does beautiful work. I really cant wait! Check out her blog here
Anyhow, back to my love....my new chair! It is my favorite peice of furniture right now, and I just love my little "corner" where I placed it. Really you need to check out Allthingsthrifty, they have me addicted to this color and I keep using it throughout my little apartment. LOVE IT! 

Check out the before pix here

Thursday, August 19, 2010

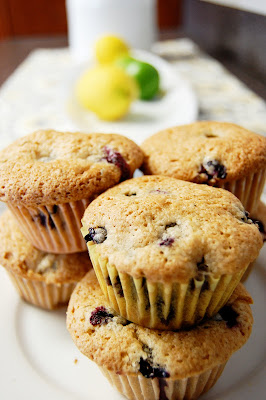
Zucchini~Blueberry Bread, can you say YUM?!


My mother-in-law gave me a huge zucchini! You know, the ones that you wonder, what on earth am I going make with this? (My favorite dish in the world is Stuffed Zucchini, but this one was almost too big for that...p.s. I will post the recipe for that one next time I make it). 
Well, so what to make? Zucchini bread of course! But this one is with a twist, added blueberries. It tastes more like blueberry muffins than just plain old zucchini bread. It really is soooo delicious both me and my whole family have to restrain ourselves from consuming all of it in one day! Best of all, my daughter LOVES blueberries, and so when she smelled and saw these babies come out of the oven she was all ready to down some, as soon as possible. And because I try to get my toddler/preschooler to eat healthy, this is a good way for her to get some veggies and more fruits in. I baked these as muffins (because she doesn't "like" your regular banana/zucchini type breads. She now just calls them Cupcakes! Hmmm would be good with cream cheese frosting too I bet. These are oh so good,  YOU MUST TRY them! Easy too. Found the recipe on one of my favorite recipe websites Allrecipes.com

Here it is, give it a try...you wont regret it!

Cat

INGREDIENTS:
3 eggs, lightly beaten
1 cup vegetable oil
3 teaspoons vanilla extract
2 1/4 cups white sugar
2 cups shredded zucchini
3 cups all-purpose flour
1 teaspoon salt
1 teaspoon baking powder
1/4 teaspoon baking soda
1 tablespoon ground cinnamon
1 pint fresh blueberries
DIRECTIONS:
1.Preheat oven to 350 degrees F (175 degrees C). Lightly grease 4 mini-loaf pans.
2.In a large bowl, beat together the eggs, oil, vanilla, and sugar. Fold in the zucchini. Beat in the flour, salt, baking powder, baking soda, and cinnamon. Gently fold in the blueberries. Transfer to the prepared mini-loaf pans.
3.Bake 50 minutes in the preheated oven, or until a knife inserted in the center of a loaf comes out clean. Cool 20 minutes in pans, then turn out onto wire racks to cool completely.

Tuesday, August 17, 2010

Mels room finished


So here it is. Mels nursery all done. I made the "Blue Devils" picture, hanger wall hanging, airplane mobile, stars blanket, and the 3 photos of old antique airplanes. It was a fun project! These pictures are kind of bad, because of the lighting, so look past the "darkness".

Monday, August 9, 2010

Mermaids

Above My homemade wall art.
I am working on making a copy of these for Bellas 2nd Birthday Present.  I have finished the 3 tiered cake and one cupcake with the box, but still have the rest to go! PBK price for just the cake $36...!! I have enough felt for everything plus more.....cost me only about $20!
Above: The Origional Potterybarn Wall art
Above: My reupholstered bench. Below: Of course she had to be a red head;-)


So I have been on this craft/project kick lately. It It all started with the Silhouettes (AHHHHHH!!!!!MUST RUN- SHE HAS IT ON THE FLOOR AND IS JUMPING ON MY SILLOUETTES!!!)...
OK....I had the picture resting on the side of the wall so I could get it hung up tonight....she didn't break it,,,Thank Goodness! Whew!


CONTINUED: And became a New Vision...."I want to redo Isabellas room and bathroom".....AND SO IT BEGINS!
Mostly I like to look up my favorite stores online like Potterybarnkids and copy what ever they have. I just cant see any sense in paying a fortune for stuff that I can easily make myself. And home made stuff is more beneficial to my pocket book and exploring talents and such. So far, I have re upholstered this old bench for Bellas room. I have also made this wall art out of tissue paper and modge podging. Ok. so it does not look exactly like the real thing (note: the picture does not capure all the details too), BUT this only cost me about $15 to make.... vs. $89! I also have made another wall art picture for her room & at the moment am working on PBkids "Plush Dessert Collection". (I want to finish it for Bellas Birthday Present)...I will post pictures of these later when I am done. I am so excited!...I haven't been so crafty in years! 10 at least! So, I will try and get as much in as possible before this "Craft Bug" disappears for another 10 years! lol 

Isabella's Big Girl Room


We finally finished the main parts of this room! I am so excited! (When spring comes we will refinish her antique bed, but that is a whole other project and that is too hard to do, when you dont have a yard to do it in and the cold weather etc. lol.
Anyhow, I blogged a while back about how I feel in love with the Potterbarnkids Brooke Bedroom, and so I used that as my main inspiration. There was no way that I could afford to buy the bedspread, so ...I made it. Big Project! Lots of Work, Sooo glad I am done! Most of the things in her room are home made, or repained old furtniture e.g. bedspread and pillows, mobiles and lamp. Her nicknacks are some of my old ones from when I was a little girl; the porcelain teaset. Well, here you have it. And the best thing is that Bella LOVES it! She has been sleeping in this new room for a month now, and everytime she goes in there she exclaims "A new room, A new bed~ Princess Bed"! So that makes it all worth it! :-) And I as an adult, can live my dreams out thru my little girl! As far as I am concerned, when we both enter into this room, we are both Princesses, and I LOVE IT!

More Sillouettes

Last week the itch began again! I exploded in "I need a new project/craft to do"! I had finished all of the project I had going before Mel was born, so it was time to start anew. Ran to Joanns for some new fabric for my livingroom/kitchen (that will be another post), and off to Savers I went. This is what I came up with;

Well, as always Potterybarnkids has the cutest ideas. I got this one from them and have been wanting to make some for Bellas room for a long time. My cute sister in law inspired me to buy second hand store frames and just paint them. So that is what I did! Each of these were $1.99 at Savers! I should have taken a before picture, but didnt. :-( But if you can imagine, the oval one was gold and looked like it belonged in a cathedral or something! lol. The others were silver or and ugly brown. Well, I had leftover fabric from Bellas bedspread so I used that as my background. Busted out the leftover white paint from all the other projects in her room and "Voila"! The sillouetts are of Isabella and of course a little owl to go with her bedroom theme. This is how it turned out, and I am very pleased. Now my next idea is to do the same, but for my living room, with black frames:-) Cant wait to start that one!

No Sew Curtains

No sew curtains. Love it.
Next project, make accessories to match with the same fabric. I was thinking perhaps pillows for my couch, or some type of runner or napkins to decorate with. (I just love the yellow and grey fabric! )
Any ideas?

Jordbaer Grod....YUMMMMMMMMMM!


So this morning I wanted to make a yummy summer dessert that is traditional in Denmark. We usually make it with all kinds of berries, or even Rhubarb. This one I made with fresh Strawberries. It is one of my favorite things to eat in the summer! I cant wait to someday sit in my backyard on a beautiful summer evening, at a beautiful table decorated with fresh flowers, a tablecloth and lit by candles. Hearing my children play, and feel the fresh Morgan air in my hair as I taste my homemade Jordbaer Grod.......ahhhh....this is one of my "fairytale" envisions of my someday house life:-)
But for now, I will enjoy it in my cute little apartment..that has AC! :-) (we were out of it for 2 weeks so I am ever so grateful, especially on a day like today...100F!)


Jordbaer Grod (Danish Strawberry Pudding)

  • Prep Time: 15 mins
  • Total Time: 30 mins min
  • Serves: 6
"This is a traditional, Danish summer dessert, slightly adapted. Very cooling and refreshing."

Ingredients

    • 2 lbs strawberries
    • 1 cup sugar (or to taste)
    • 1 quart water (reserve 1/2 cup)
    • 1/2 cup cornstarch
    • 1 tablespoon lemon juice (fresh only, please)
    • 1/2 teaspoon vanilla extract
    • 1/2 teaspoon almond extract
    • 1/2 cup water

    To serve

    • 1 to taste cold heavy cream

Directions

  1. Hull and rinse berries. Add to water and bring to a boil over medium heat. Add sugar and simmer until berries are tender, 10-15 minutes (depending on size of berries). Lower heat to medium-low.
  2. Dissolve cornstarch, lemon juice and vanilla and almond extracts in reserved 1/2 cup water, and add to berries and sugar. Bring to rolling boil, stirring constantly. Continue stirring and allow pudding to boil a few minutes until thickened. Ladle into individual serving bowls. Cool.
  3. To Serve: Sprinkle with sugar and serve with cold, heavy cream......Note: I "dump" the sugar on it! I like mine Sweeeeeeeet! :-)This is better the next day! Let it sit in the fridge....so yum!

Æbleskiver= Happy Tummies


Ever wonder what in the world these pans are for?

Well, here you have it a very traditional danish dish....

Æbleskiver


I made some last saturday for breakfast and YUM they are sooo good! We all love them. I grew up eating these all the time, either as a dessert treat or for breakfast. Americans eat doughnuts, Danes eat Aebleskiver.:-)

Here is the recipe (there are many different variations of it, using buttermilk and lemon zest, but this is the one I used, this recipe is from the cookbook Cooking Danish by Stig Hansen) they take some practice to get right, but are totally worth it:-) We eat them sprinkled in powdered sugar and dipped in Raspberry or strawberry jam:-)


Makes 24 to 26
1 3/4 cups bread flour (I used all purpose)
2 teaspoons instant dry yeast
1/2 cup granulated sugar
1/2 teaspoon ground cardamom
1/4 cup (1/2 stick) butter
1 cup 2% milk (I used fat free)
2 eggs
Shortening ( I used vegetable oil)
Confectioners' sugar


(You will need an Æbleskiver pan to prepare these doughnuts. They can be found in many kitchen equipment stores and in Scandinavian import stores.)
1 - Combine the flour with the yeast, sugar and cardamom in a mixing bowl. Combine the butter and milk in a saucepan and heat to 70 to 80 degrees. Add to the flour mixture and mix well. Mix in the eggs. Cover with plastic wrap and let rise in a warm place for 1 hour or until doubled in bulk.
2 - Heat an Æbleskiver pan over low to medium (300-degree) heat. Add a small amount of shortening on the tip of a knife to each cup. Spoon the dough into the cups filling four-fifths full.Cook until the bottoms begin to brown and push one-fourth of the doughnut up to begin to brown the top. Repeat the process, then turn the doughnut completely over to form a ball and cook until golden brown all over.
3 - Remove to a serving plate and sprinkle with confectioners' sugar. Serve with Raspberry Jam, applesauce and sugar to dip in.

My Danish Great Grandmas antique Chair Revamp

Ok, so I have like a few antique furniture pieces that have been passed down to me from Denmark. When we came to the states back in 97' my parents loaded up a huge "Evergreen" container with all of our belongings to bring over from there. When my parents divorced I got a lot of the old furniture since I have ALWAYS loved Antiques ever since I was a little girl. And this was one of them. My Great Grandmothers old chair, with no seat. My parents always wanted to fix it up but never got around to it, and I saved it from being trashed. For the longest time I have been thinking about what color to do it. Red, Black, White, but than I saw this chair idea on a website my friend told me about, Allthingsthrifty.com. I simply fell in love! ( You know I visit that site like 5 times a day!) And the colors she used for her old chair. LOVE IT! Anyhow, so here is my first attempt to Spraypaint & antique a piece of furniture, and I am IN LOVE...for real! I love this color and the antiquing was so easy! And Cheap too:-) A few bucks for the spraypaint, and $14 for Ralph Lauren Glaze, that will like last me for the rest of my life, one uses so little.
Now, the hunt is on for the right fabric to make a seat. (Here is the chair all done with fabric and all)
And now all my other handmedown furniture & antiques (100yr old headboards, 1920's Pfaff sewing machine) wont seem as intimidating for me to redo anymore:-)


Click on images to take a closer look


Related Posts Plugin for WordPress, Blogger...