Pages

Thursday, December 29, 2011

Happy New Year! {2012 vignette}

What a wonderful Christmas we had this year! Such a special time for our little family. Today I began the "taking down" of the Christmas decor...sniff sniff. As usual I take everything down but my Tree. I wait to take them down until January 1. I love ringing in the New Year with the twinkleing Christmas lights in my living room. While growing up in Denmark, New Years Eve was always a BIG deal. Parties and Fireworks galore! We all would stand on a couch or chair and once the old towns clock in Copenhagen struck its twelfth chime we would "jump" into the new year. From outside could be heard a hurrendious sound of somethin like a war zone of fireworks filled the air. we would all wish each other a Happy New Year, sing the Danish new years anthem, and thus proceed to watch the queen of Denmarks Annual new years address to the nation. Whew...what the walk down memory lane!! So, to lighten up my spirits And saddened empty that the lack of Christmas decor left my home and heart, I decided to make a New Years vignette.
And let me say...it Indeed lightened my spirits to welcome in this 2012 year! A new year, new hope, new life, new dreams, new memories to be had, and new adventures!

 I kept up my cream painted branch, than looked up online "Vintage Clock" images. I downloaded them, and printed them up in black and white onto some cut up lunch sacks! lol. Than I embellished them with some old bookpage "firework" details. Hot glued it all together and added clear thread so they seem like they are "floating". And now I have Clocks hanging ornaments:-)
Here is a close up....Oh and I added GLITTER of corse! 
 Another close up...
 I had this picture mat lying around {a leftover from a Christmas present I made}. I knew it would come in handy! Quickly busted out my new Cricut machine {Santa totally surprised me with it this year...Oh how I LOVE my Santa};-) It happily cut out the {2012} for me. Than again added glitter to it all. {its hard to see on the pic}.
 My sweet Vintage B.L Snowman looked GREAT with this, AND I am so glad that he can follow my decor into the New Year!
 For some texture I used glitter Stars, silver ribbon and again my Cricut busted out these adorable snowflakes. Natural colored paper confetti and a antique crochet doily for the backdrop. I also added some crystal beads for some Bling. {New Years Eve is all about Bling right}?
 I filled some crystal toasting glasses with Pearls....ahh I love me some pearls!
And there you have it, A New Years Vignette, made of things I had lying around the house.


 Happy New Years!

hugs
Cat

linking at :
http://frommyfrontporchtoyours.blogspot.com/

Thursday, December 22, 2011

A small little votive {g}

I made this a few weeks ago, but neglected to get it posted. {Christmas prep getting done and all}.
 All it was, was an old square wood candle holder. I painted it white, distressed it, and added a piece of burlap with the letter {g}. I made it as a test letter once when I wanted to make my fall banner. Well it came in handy for this to embellish it a bit:-) I NEVER through anything away!lol
And here you have it. I think it turned out cute!
Merry Christmas to ALL! 
Enjoy this weekend and dont get stressed out...Just ENJOY...and BE;-)

Wednesday, December 14, 2011

Evergreen & Pine Garland {live}

Oh yes, I wish I had a beautiful wooden front door, with beautiful trim and several transom windows....but alas I do not. 
But that WILL NOT stop me from adorning our current humble front door with Christmas Cheer! :-) I made this Evergreen garland VERY easily using blue spruce twigs, green wire and pinecones. I attached the long pieces of evergreen together with the wire {ouch}! lol. Than did the same with the pine cones. hung it up be simply hammering a few nails in the doorway so it had something to "hang" on to. SO EASY!
I think it is SO pretty and I am SOO happy how it turned out:-)
{oh and this was all free}
thanks mother nature! I will forever be doing this for some festive front door decor! 
Here it is, with my PB inspired Swag.

 These urns looked so sad and empty now that their flowers were sleeping for the winter. So I just filled them with the greenery leftovers I had. {even had a few holy branches too, to add}. And than a few logs to add some texture. 
And here is one of two little lights we have next to our front door. I added some greenery and a big silver $ store bow. Done. {it did have more evergreen behind it earlier in the week...but a BIG record breaking windstorm swept it away.} Lets just say I am lucky my garland is still in tact.... not to mention our roof!

I Love these homemade evergreen garlands SO much I dont EVER want to take it down!! 
And here's to the day when I will have a pretty wooden front door..with my Transom windows.:-)

Monday, December 12, 2011

Vintage Oil Lamp "Spruced" Up! lol

Another treasure my husband found for me the other day. I was so excited when he showed me them, because they remind me of the Victorian era. {one of my favorite movies is A Little Princess}. 
 Perfect with my Christmas Decor, I literally spruced it up with a few live Evergreen springs. I have been loving using live greens this year. Dont think I will ever go back to the cheap fake ones. Now...the Expensive fake ones on the other hand...well THATS somethin I will Keep! lol

Aluminum {mercury glass inspired} Christmas Ornaments...DIY

I keep seeing these branches spray painted white so I had to give a go at it myself! So I found my branch {one that I used for both my halloween AND thanksgiving decor this year}. Spray painted it. 
Than hung it up with some fish string. Its so cool, because its "invisible". Next I added a few homemade foil paper ornaments! haha! I know what you are thinking...tacky! Oh well, I like how they turned out, they remind me of old mercury glass or old metal. 
 To make the flat ornaments I took a square piece of foil. 
Used modgepodge to stick it together as I folded it over a few times to get it thicker/sturdier. 
Than I cute out the shapes and crinkled it a bit for texture. 
Last I used some black/dark brown glaze paint to give it the "rusty" like look. (Wiping off any exess).
Once dry strung them with fish string too. 
 And done. I also added a few $ store silver ornaments.
 Makes a great overhang for our Nativity!
Thanks for stopping by!
Enjoy these next 12 days until Christmas comes! ;-)

Sunday, December 4, 2011

Decorating for Christmas {Upstairs & In my Bedroom}

I am just loving this Holiday Cheer! So this year I decided to start decorating our Bedrooms. Thats Right...kind of odd, but whenever I have seen such things done in magazines I just swoon, at the thought of Christmas in other rooms, besides of our main living areas. So I started with my Bedroom. I added a Red Crimson satin pillow to my all white {and a touch of black} bedspread. Than a cream afghan at the foot of the bed. A touch of real fresh holly {dried} and a cream & red cute snowflake sachet and I'm done...for this year. lol
 It makes me smile to wake up looking at this real holly branch over my head every morning. I when I first placed it there it was still live. But I also enjoy the dried too. 
 For Our upstairs hallway I attached these red christmas ornaments to a piece of jute and hung it up. Kind of like a banner of sorts. My kids love it, because it is right above their collection of books that we keep in my homemade "pallet bookcases". Or what they call their "Library". 
Oh and now for my FAVORITE thing. {well one of them}. I came across this TREASURE at TJ Maxx  in the summer. A GORGEOUS star all made of drift WOOD!! My little 4 yr old actually pointed it out to me as we were walking down the isles. "Mama, look at this Beautiful STAR"! Oh my HECK girl...she sure knows her stuff! It was indeed Beautiful! lol. I HAD to bring it home! 
And so I did for $24 . 
{no way I didnt make this....But I sure would have tried if I had an Ocean nearby! hahaha}

 To make this more 'christmasy' I added a few fresh springs of a very fine needled evergreen. {I dont know the exact type}. A type of Fir I guess?
And there you have it....some more NATURAL christmas decorating ideas. I just love it, the simplicity of it all. Its SO easy to make your decor better when bringing some of nature indoors.
And CHEAP too;-)
Now go find yourself a HOLLY bush... ok. :-)

Wednesday, November 30, 2011

He knows me so well!

Ok. So my sweet husband brought me home these yesterday {with a few other antique treasures}! He came across these while cleaning out some storage units at work. {someone had left them behind}. I am ECSTATIC! A whole set of 10 Vintage Griffith's Laboratory Milk Glass Jars. SWEEEEET! Mine are like the ones in this picture {these are from a pic I found online}. They have the red lids, and only 2 original labels left of them. I am not in love with the Red, so I have plans to repaint them. {Sorry to all you red lovers out there, the Red is nice, but it doesn't match my kitchen decor.} My husband knows me so well:-) It was like Christmas for me! Anyhow, stay tuned for my Vintage Spice jar revamp...
Now what color to paint them? I was thinking perhaps oil rubbed bronze?
Any suggestions?

Monday, November 28, 2011

My Burlap, white & silver Christmas Trees..

I have told this story before, but we have a tiny little place. And thus, a normal sized Christmas tree would just be too large for our "skinny" living room. So my mother in law gave me these 3 trees years ago {she was getting rid of them}. And until we move into a house I have been using these, and they work GREAT! They can fill a lot, but still keep it on the "skinny" {if that makes any sense}. My tree has always been white, red and silver. So this year I took out my red ornaments, to switch it up. {Yes, I have joined the masses in doing an all white Christmas tree}. But seriously there is just something so calming and classy about it. My daughter and I had a blast setting this up. And we still have our sweet red ornaments {I used them for decorations upstairs in our bedrooms this year}. YES, decorating for Christmas in our Bedrooms! Its a brand new thing for us....Yipee! ;-) {pix to come}.
Dont mind the bottom of the trees...my kids like to make messes with our Danish Christmas Elves and Fisher Price Nativity;-) I am in the process of making a ruffle tree skirt to go underneath it;-) Stay tuned!


This tree has Vintage, Rustic and some glitz and glam:-)

I LOVE snowflakes!!


I have ONE red ornament on this tree. A nail with a red ribbon tied around it. It is a sentimental thing, that helps us focus on the true meaning of Christmas. {The vintage frame has a poem that goes with it}


I think I still have a few handmade ornaments to put on this tree before it is perfectly done. You know how it is...Christmas Trees a constant work in progress. lol

And here are my vintage inspired heirloom stockings I made last year. I have this nice new garland that I bought last year to go with it....LOVE IT! ;-)
And there you have it.....my Trees this year.

Thanks for Stopping by my CC's Corner!

~Cat

Saturday, November 26, 2011

PB Inspired Christmas Swag DIY

I am in LOVE with door swags these days. So I wanted to make my own. When I came across this one on Potterybarns website, it was an instant "I can totally make that"! {I love those moments};-) 

Here is the Potterybarn version.

 {I searched everywhere for big metal bells like these, but my only luck were these smaller ones at the Dollar Store. Could NOT beat the price! So this swag is inspired by PB but with my own twist }.
 *if i do come across these, you bet I will replace the ones I have, but for now these cute little ones will do.
 Here is my version

  1. I started by bunching some "naked" dry twigs together with wire.
  2. Than on top of that added my freshly clipped Evergreen. Also with wire.
  3. Next I strung all my bells together with some jute, and attached it all together with this lovely burlap wired ribbon. 
  4. Last I made a "hanger" with some wire.
And thats all folks! I think it turned out SO cute:-)
And it was EASY peasy! ;-)


Friday, November 25, 2011

LIVE Holly Wreath and a few knick knacks

I have been SO excited to put up my Christmas Decor and now the time has finally come! Yes its still November, but once Thanksgiving is over, its time for THE next holiday to be celebrated. lol
I started out by taking my kids to the Park. Yup, its been gREAT weather here so, I took them out and while they played I brought my clippers and bags for my future Christmas projects, and cut oh so many lovely greenery. {This year I want to use as much live greenery as possible}. Not only because its CHEAP or shall I say FREE, but also because it is BEAUTIFUL. {I have a special place in my heart for this kind of stuff because my Mom is a MASTER at flower arranging....and well...it just reminds me of my sweet Mama}. So here is my first attempt at a wreath. This one is made from Holly leaves....OUCH! lol. That is what I was saying through out making this little baby. But OH it was SO worth it!! I used a already white berry wreath {like the ones they have at PB a few years ago} and covered it with Holly branches. {I used my glue gun & green wire}. 
 Finished it off with a nice piece of wired Burlap ribbon.
L.O.V.E
Than for some shabby Christmas decor I rounded up these babies, 

Mason jars :
  1. filled with antique lace/doilies
  2. Pearls and a sprig of FRESH evergreen {smells OH SO GOOD}.
  3. Vintage door knob & key holder and some other random metal goods


 OK. so I am sure I have mentioned how I LOVE Bethany Lowe Designs. Well, I happened across this lovely little guy at TJ Maxx the other day. I saw him and GASPED, A REAL "Vintage by Bethany"?! I was in love! Than I left the store, convincing myself I didnt need it....well....That was on a Saturday. ALL the rest of that weekend I could not get it out of my head! lol...so Monday morning I went back hoping he would still be there {because if he was than it was meant to be}. I could not believe it!! He was there! And $16 later I went home a happy lady:-) I think he is so cute.
So here is the first of my Christmas Decor. I am all finished with a swag I made for the front door...I just need it to be light outside so I can grab a pic and post about it. AND yup...its a PB inspired Christmas swag, so stay tuned;-)

Pin It

Wednesday, November 23, 2011

Happy Thanksgiving

Just wanted to wish all of my DEAR readers a Happy and Wonderful Thanksgiving!

Thank YOU for all YOUR Support in hanging out at my Creative Corner!

Smiles
~Cat

Tuesday, November 22, 2011

And here it is My Studio 5 Moment!

We had some technical difficulties, {I cant help but laugh at my sitting there and not being able to hear Brook and Darin} lol! Luckily I have NO SHAME! hahaha!

Anyways...enjoy! ;-)


Thank YOU so MUCH to Studio 5 for giving me this opportunity! ;-)

Monday, November 21, 2011

OH MY goodness...ME on TV??!!


For those of my readers who live in the Utah area, I am going to be featured on
 KSL's Studio 5, (via Skype), LIVE tomorrow! I will be talking about my Thanksgiving {Grateful} sign. 

KSL channel 5 @ 11AM
 I have wanted to go on this show like forever, so this is a "dream" of mine:-)
I am SOOOOO Excited AND nervous , so wish me LUCK;-) At least it will be from the comfort of my home. Hopefully we wont have any Skype issues.

This is my first EVER tv "gig"! lol 
{that sounds weird}
Thanks for all your support! I LOVE MY READERS!

hugs
Cat


Wednesday, November 2, 2011

Thanksgiving! {No...not Christmas Yet, though the countdown has begun}

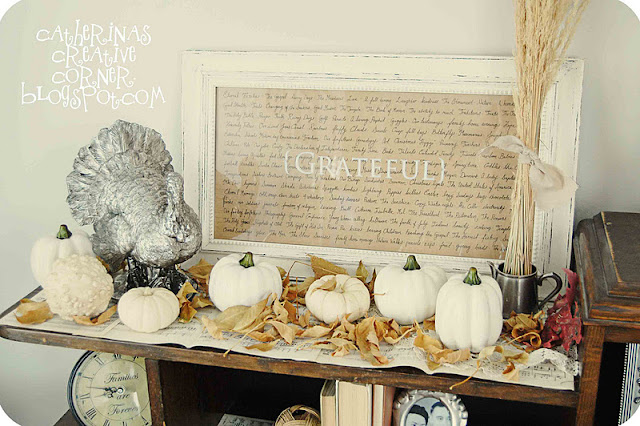
I love Thanksgiving. Yes I know I say I love each holiday, but there is something special about it. Probably because it is right before Christmas {my favorite holiday}. It is so short, but I love it, and this year I wanted to get some decorations up that coincided with it. It gave me an excuse to keep up my fall decor that didn't have any Halloween stuff attached to it. {Like my lovely cream pumpkins}.
Every year I usually blog about things that I am thankful for from Nov 1- Thanksgiving Day. This year I wanted to do something different. And came up with this. 
It is a combination of several online inspirations:-)

{GRATEFUL}
Making this {GRATEFUL} sign caused me to reflect on all the things our little family is grateful for. I absolutely encourage ALL who read this to make one:-) If you are not into crafty stuff, just fill up your journal with a few pages of things you are Grateful for in your life. 
This was a heartwarming experience for me to do, and I LoVe the Value of what this little picture frame represents in our life! 
OK... I found myself a TURKEY! Yup, when I told my husband about my awesome find, he just rolled his eyes at me:-) lol! I  fell in love with the PB White ceramic turkey, but 129 $ is just a little over my budget! lol. So on the hunt I went to find a turkey figurine that I could paint white or something {to look similar to the PB one}. This silver beauty cost me $20, but now I dont know if I should paint her or not? 
Hmmm... any suggestions?
I am torn.
 This picture frame used to be black. I spray painted it Heirloom White, and than distressed it. 
LOVE!
Next to get the background for this picture I actually just used the cardboard backing that came with it! It already had a rustic, natural feel to it, and even had lines I could use to stay on track with  my writing. Now as for the writing, I do not have the pretties handwriting around. BUT, when you write to fill up a whole page like this, it becomes ART and as a whole looks awesome! Trust me, I have used this method MANY times in other art projects I have done, and it WORKS with even normal "non fancy" letters.  

Now, for the bottom of the display I used old sheet music, REAL Fall leaves {I use them every year. Just tell your kids to go find you some...its SO fun for them}, and some antique lace/doilies. 
LOVE
 More sheet music and old books
 I always try to incorporate natural elements. here are some "pokey thingies";-) 
Some kind of thistles?
If someone knows the names of these...please feel free to comment:-)
 Some more antique books. "Beside the Bonnie Briar Bush" This one is from 1900 ;-)

Happy Thanksgiving Everyone!
Let the Countdown begin {24 or so days until my Christmas Tree goes up}!
Until than I will enjoy this little "spread" as long as it lasts:-)


Pin It

Related Posts Plugin for WordPress, Blogger...